![]()
总览
| 函数声明 | 函数功能 |
|---|---|
void *sbrk(intptr_t increment); |
它是一个 Unix 系统的函数,用于调整程序的堆空间。 |
double scalb(double x, double n); |
计算 x 乘以 2 的 n 次幂(double) |
float scalbf(float x, float n); |
计算 x 乘以 2 的 n 次幂(float) |
long double scalbl(long double x, double n); |
计算 x 乘以 2 的 n 次幂(long double) |
double scalbln(double x, long int n); |
计算 x 乘以 2 的指定长整数 n 次幂(double) |
float scalblnf(float x, long int n); |
计算 x 乘以 2 的指定长整数 n 次幂(float) |
long double scalblnl(long double x, long int n); |
计算 x 乘以 2 的指定长整数 n 次幂(long double) |
double scalbn(double x, int n); |
计算 x 乘以 2 的指定整数 n 次幂(double) |
float scalbnf(float x, int n); |
计算 x 乘以 2 的指定整数 n 次幂(float) |
long double scalbnl(long double x, int n); |
计算 x 乘以 2 的指定整数 n 次幂(long double) |
int scanf(const char *format, ...); |
从标准输入中读取指定格式的数据 |
void sector( int x, int y, int stangle, int endangle, int xradius, int yradius ); |
画并填充椭圆扇区(Windows BGI) |
void segread(struct SREGS *sregs); |
它是一个 DOS 函数,用于从内存段(segment)中读取内容。 |
void setactivepage(int pagenum); |
用于切换当前显示的页面 |
void setallpalette(struct palettetype *palette); |
用于设置图形界面的整个调色板 |
void setaspectratio( int xasp, int yasp ); |
设置图形纵横比 |
void setbkcolor(int color); |
用于设置当前绘图窗口的背景色 |
void setbuf(FILE *stream, char *buffer); |
用于设置标准输入流、标准输出流或标准错误流的缓冲方式 |
void setcolor(int color); |
设置当前绘图颜色 |
void setfillpattern(char *upattern, int color); |
用于设置当前绘图窗口的填充图案 |
void setfillstyle(int pattern, int color); |
用于设置当前绘图窗口的填充样式,即用什么颜色或图案来填充绘制的图形 |
void setgraphmode(int mode); |
设置当前的图形模式 |
int setjmp(jmp_buf env); |
用于在程序执行过程中设置跳转点,并将当前程序状态保存到一个缓冲区中。当程序需要从该跳转点继续执行时,可以使用 longjmp() 函数恢复之前保存的程序状态并返回到该跳转点。 |
1. sbrk
1.1 函数说明
| 函数声明 | 函数功能 |
|---|---|
void *sbrk(intptr_t increment); |
它是一个 Unix 系统的函数,用于调整程序的堆空间。 |
参数:
- increment : 增加的堆空间的大小
返回值:
- 如果调用成功,返回值即为增加空间前的原始堆顶指针;
- 如果出错,则返回
(void *)-1
1.2 演示示例
1 |
|
在上述示例中,
- 首先调用
sbrk()函数将堆顶位置向上移动 64 字节; - 然后将返回的指针保存在变量
mem中;如果 sbrk 调用失败(即返回值等于(void *)-1),则程序通过perror()函数输出错误信息并返回1; - 最后,程序打印出分配的内存地址,并返回
0表示程序成功运行。
2. scalb,scalbf,scalbl
2.1 函数说明
| 函数声明 | 函数功能 |
|---|---|
double scalb(double x, double n); |
计算 x 乘以 2 的 n 次幂(double) |
float scalbf(float x, float n); |
计算 x 乘以 2 的 n 次幂(float) |
long double scalbl(long double x, double n); |
计算 x 乘以 2 的 n 次幂(long double) |
注意:如果 n 超过了可表示的范围,或者结果溢出,则函数可能返回正无穷大、负无穷大或 NaN。
2.2 演示示例
1 |
|
3. scalbln,scalblnf,scalblnl
3.1 函数说明
| 函数声明 | 函数功能 |
|---|---|
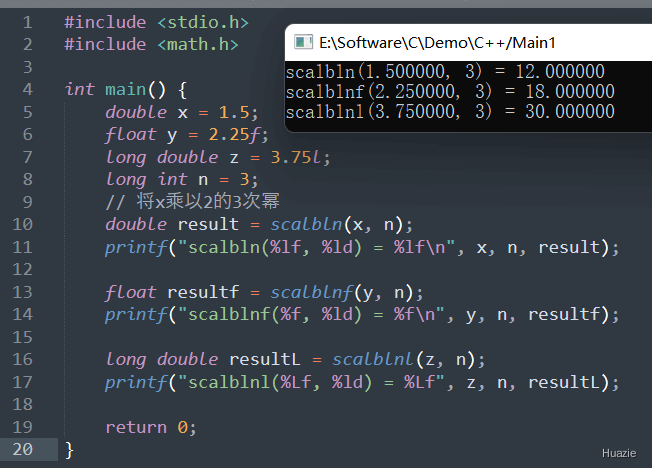
double scalbln(double x, long int n); |
计算 x 乘以 2 的指定长整数 n 次幂(double) |
float scalblnf(float x, long int n); |
计算 x 乘以 2 的指定长整数 n 次幂(float) |
long double scalblnl(long double x, long int n); |
计算 x 乘以 2 的指定长整数 n 次幂(long double) |
3.2 演示示例
1 |
|
3.3 运行结果
4. scalbn,scalbnf,scalbnl
4.1 函数说明
| 函数声明 | 函数功能 |
|---|---|
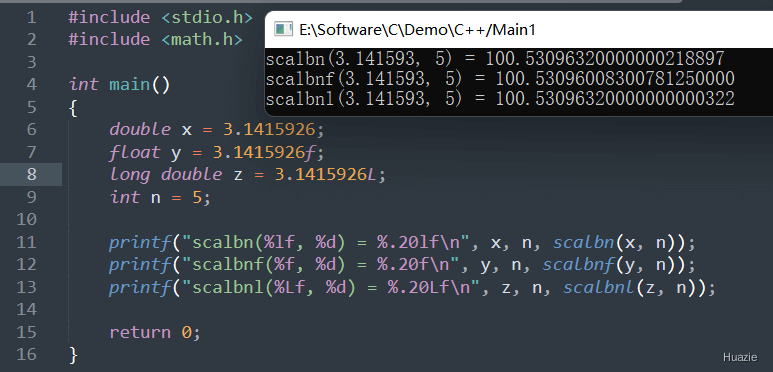
double scalbn(double x, int n); |
计算 x 乘以 2 的指定整数 n 次幂(double) |
float scalbnf(float x, int n); |
计算 x 乘以 2 的指定整数 n 次幂(float) |
long double scalbnl(long double x, int n); |
计算 x 乘以 2 的指定整数 n 次幂(long double) |
4.2 演示示例
1 |
|
4.3 运行结果
5. scanf
5.1 函数说明
| 函数声明 | 函数功能 |
|---|---|
int scanf(const char *format, ...); |
从标准输入中读取指定格式的数据 |
详细内容 可参考 《scanf》
5.2 演示示例
1 |
|
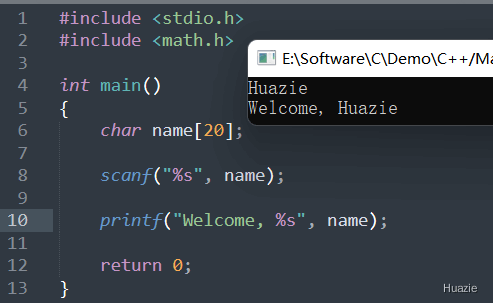
在上述示例中,实现了从标准输入中读取一个字符串,并输出欢迎消息。
- 我们首先定义一个名为
name的字符数组,长度为 20; - 然后使用
scanf()函数从标准输入中读取一个字符串,存储到name数组中; - 最后使用
printf()函数输出欢迎消息,其中%s表示字符串格式化符号,会被name所代替。
5.3 运行结果
6. sector
6.1 函数说明
| 函数声明 | 函数功能 |
|---|---|
void sector( int x, int y, int stangle, int endangle, int xradius, int yradius ); |
画并填充椭圆扇区(Windows BGI) |
参数:
- x : 扇形的圆心坐标的 x 轴
- y : 扇形的圆心坐标的 y 轴
- stangle : 起始角度(以度数为单位)
- endangle : 结束角度(以度数为单位)
- xradius : 横向半径
- yradius : 纵向半径
6.2 演示示例
1 |
|
6.3 运行结果

7. segread
7.1 函数说明
| 函数声明 | 函数功能 |
|---|---|
void segread(struct SREGS *sregs); |
它是一个 DOS 函数,用于从内存段(segment)中读取内容。 |
7.2 演示示例
1 |
|
上述的这个示例程序,使用了 <dos.h> 头文件中的 segread() 函数和 struct SREGS 结构体,并打印出数据段(DS)、代码段(CS)和堆栈段(SS)的值。
8. setactivepage
8.1 函数说明
| 函数声明 | 函数功能 |
|---|---|
void setactivepage(int pagenum); |
用于切换当前显示的页面 |
8.2 演示示例
1 |
|
上述示例将在屏幕上绘制两个页面,并允许用户通过按任意键查看第二个页面。
8.3 运行结果
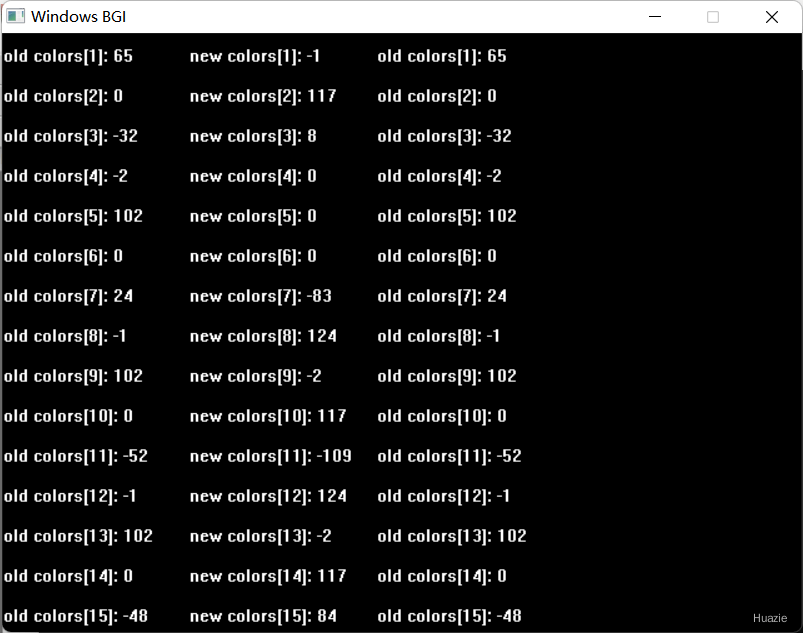
9. setallpallette
9.1 函数说明
| 函数声明 | 函数功能 |
|---|---|
void setallpalette(struct palettetype *palette); |
用于设置图形界面的整个调色板 |
参数:
- palette : 调色版结构体
9.2 演示示例
1 |
|
9.3 运行结果
10. setaspectratio
10.1 函数说明
| 函数声明 | 函数功能 |
|---|---|
void setaspectratio( int xasp, int yasp ); |
设置图形纵横比 |
参数:
- xasp : 水平缩放比例
- yasp : 垂直缩放比例
10.2 演示示例
1 |
|
注意: 因为 BGI 图形库在 Windows 上的实现是基于 Win32 API 的简单封装,并且没有提供缩放功能,所以上述程序在 Windows BGI 下不支持缩放功能,也就是 setaspectratio 没有效果。
11. setbkcolor
11.1 函数说明
| 函数声明 | 函数功能 |
|---|---|
void setbkcolor(int color); |
用于设置当前绘图窗口的背景色 |
参数:
- color : 要设置的颜色,预定义颜色有如下:
| 颜色值 | 英文枚举 | 中文描述 |
|---|---|---|
| 0 | BLACK | 黑 |
| 1 | BLUE | 蓝 |
| 2 | GREEN | 绿 |
| 3 | CYAN | 青 |
| 4 | RED | 红 |
| 5 | MAGENTA | 洋红 |
| 6 | BROWN | 棕 |
| 7 | LIGHTGRAY | 淡灰 |
| 8 | DARKGRAY | 深灰 |
| 9 | LIGHTBLUE | 淡兰 |
| 10 | LIGHTGREEN | 淡绿 |
| 11 | LIGHTCYAN | 淡青 |
| 12 | LIGHTRED | 淡红 |
| 13 | LIGHTMAGENTA | 淡洋红 |
| 14 | YELLOW | 黄 |
| 15 | WHITE | 白 |
11.2 演示示例
1 |
|
注意: 在修改背景颜色后,需要使用 cleardevice() 函数清除先前绘制的图形并更新背景颜色,不然背景颜色的修改不会生效。
11.3 运行结果

12. setbuf
12.1 函数说明
| 函数声明 | 函数功能 |
|---|---|
void setbuf(FILE *stream, char *buffer); |
用于设置标准输入流、标准输出流或标准错误流的缓冲方式 |
参数:
FILE *stream: 目标文件流指针(如 stdin, stdout, stderr 或 fopen() 返回的指针)。必须指向已打开的文件流。char *buffer: 缓冲区指针。- 若传递有效缓冲区地址:使用该缓冲区作为流的缓存
- 若传递 NULL:禁用缓冲
12.2 演示示例
1 |
|
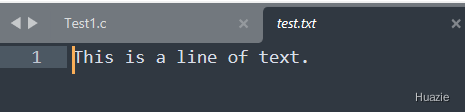
在上述这个示例程序中,我们打开了一个名为 test.txt 的文件,并使用 setbuf() 函数将其设置为不带缓冲。然后,我们向文件中写入一行文本,关闭文件并退出程序。
由于我们已经将文件设置为不带缓冲,因此写入的数据将直接写入磁盘,而不会在内存中留下缓冲区。
12.3 运行结果
13. setcolor
13.1 函数说明
| 函数声明 | 函数功能 |
|---|---|
void setcolor(int color); |
设置当前绘图颜色 |
参数:
- color : 要设置的颜色,预定义颜色有如下:
| 颜色值 | 英文枚举 | 中文描述 |
|---|---|---|
| 0 | BLACK | 黑 |
| 1 | BLUE | 蓝 |
| 2 | GREEN | 绿 |
| 3 | CYAN | 青 |
| 4 | RED | 红 |
| 5 | MAGENTA | 洋红 |
| 6 | BROWN | 棕 |
| 7 | LIGHTGRAY | 淡灰 |
| 8 | DARKGRAY | 深灰 |
| 9 | LIGHTBLUE | 淡兰 |
| 10 | LIGHTGREEN | 淡绿 |
| 11 | LIGHTCYAN | 淡青 |
| 12 | LIGHTRED | 淡红 |
| 13 | LIGHTMAGENTA | 淡洋红 |
| 14 | YELLOW | 黄 |
| 15 | WHITE | 白 |
13.2 演示示
1 |
|
13.3 运行结果
14. setfillpattern
14.1 函数说明
| 函数声明 | 函数功能 |
|---|---|
void setfillpattern(char *upattern, int color); |
用于设置当前绘图窗口的填充图案 |
参数:
- upattern : 填充图案
- color : 填充颜色
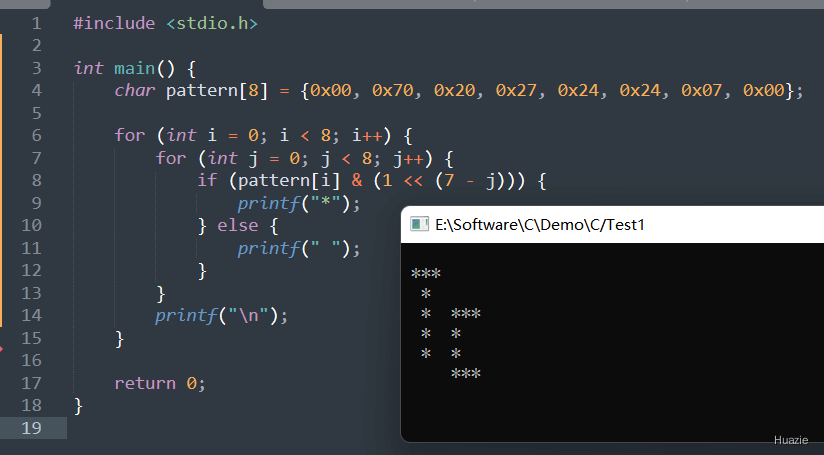
在调用 setfillpattern() 函数之前,需要先定义一个名为 upattern 的字符数组,并将其用作填充图案。这个图案通常使用一个 8 字节的字节数组表示,每个元素包含一个 8 比特位的掩码,用于表示该位置是否应该被绘制斜线或其他样式。
14.2 演示示例
1 |
|
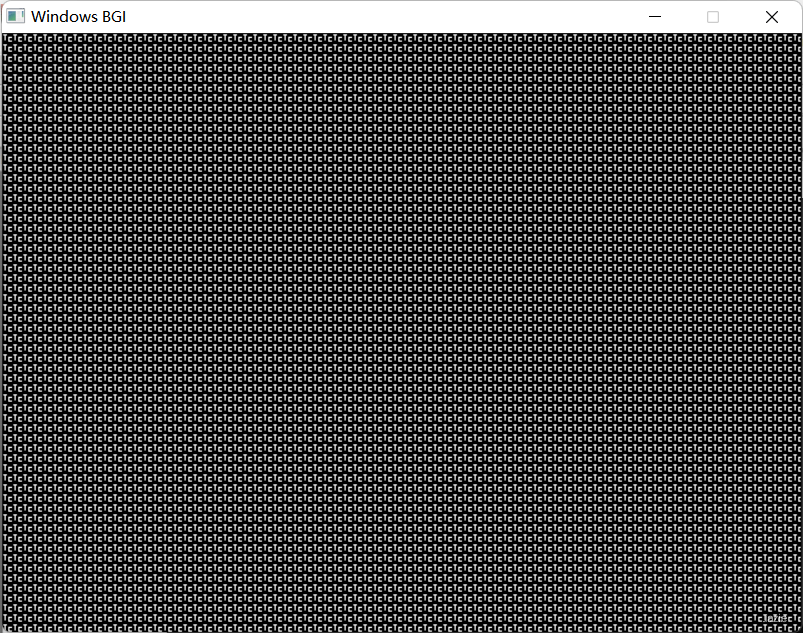
上述程序使用了 Windows BGI 图形库来创建一个空白的图形窗口,并在其中填充一种斜线筛子图案。
何为斜线筛子图案,参考如下程序打印:
1 |
|
14.3 运行结果
15. setfillstyle
15.1 函数说明
| 函数声明 | 函数功能 |
|---|---|
void setfillstyle(int pattern, int color); |
用于设置当前绘图窗口的填充样式,即用什么颜色或图案来填充绘制的图形 |
参数:
- pattern : 填充样式
- color : 填充颜色
如下是支持的填充样式:
| 填充样式值 | 英文枚举 | 中文描述 |
|---|---|---|
| 0 | EMPTY_FILL |
空填充(无填充) |
| 1 | SOLID_FILL |
实心填充 |
| 2 | LINE_FILL |
横线填充 |
| 3 | LTSLASH_FILL |
细斜线填充(左斜) |
| 4 | SLASH_FILL |
粗斜线填充(左斜) |
| 5 | BKSLASH_FILL |
粗反斜线填充(右斜) |
| 6 | LTBKSLASH_FILL |
细反斜线填充(右斜) |
| 7 | HATCH_FILL |
网格阴影填充 |
| 8 | XHATCH_FILL |
交叉网格填充 |
| 9 | INTERLEAVE_FILL |
交错线填充 |
| 10 | WIDE_DOT_FILL |
稀疏点状填充 |
| 11 | CLOSE_DOT_FILL |
密集点状填充 |
| 12 | USER_FILL |
用户自定义填充模式 |
setfillstyle() 函数还支持使用用户自定义的填充样式。如果要使用用户自定义的填充样式,需要调用 setuserchars() 函数来设置填充字形,然后将填充样式参数设置为 USER_FILL。
15.2 演示示例
1 |
|
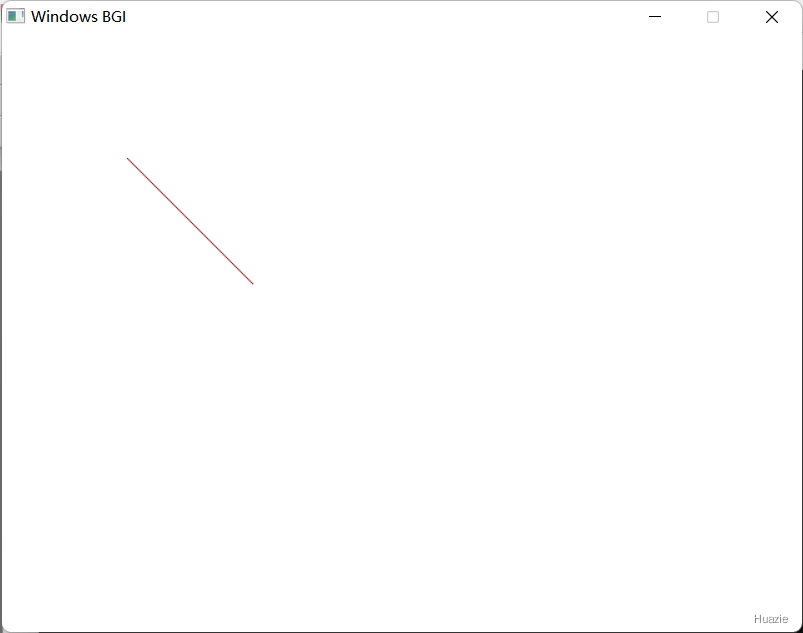
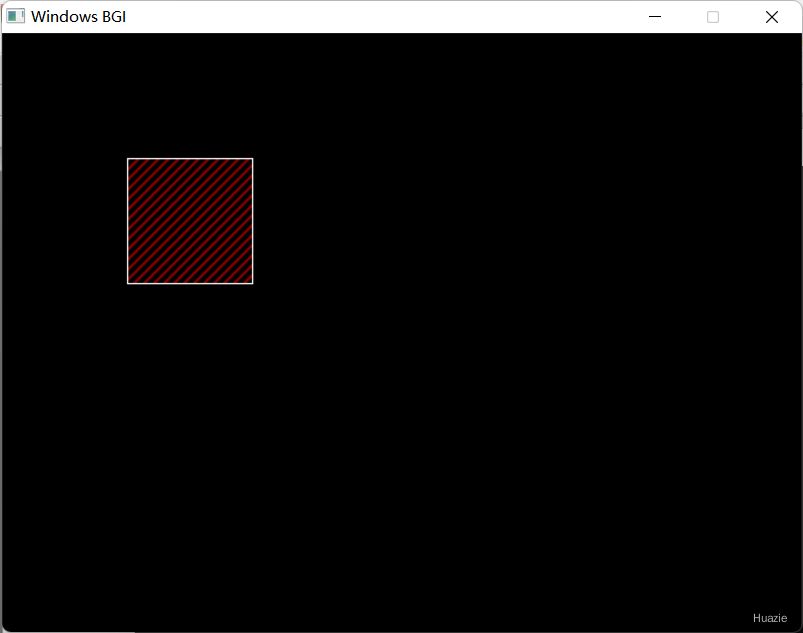
在上述的示例程序中,
- 我们首先使用
setfillstyle()函数将填充样式设置为斜线筛子图案(即SLASH_FILL样式),颜色设置为红色。 - 然后,我们使用
rectangle()函数在图形窗口中绘制一个矩形,并使用floodfill()函数将该矩形填充为红色的斜线筛子图案。 - 最后按任意键退出图形模式。
15.3 运行结果
16. setgraphmode
16.1 函数说明
| 函数声明 | 函数功能 |
|---|---|
void setgraphmode(int mode); |
设置当前的图形模式 |
16.2 演示示例
1 |
|
16.3 运行结果
17. setjmp
17.1 函数说明
| 函数声明 | 函数功能 |
|---|---|
int setjmp(jmp_buf env); |
用于在程序执行过程中设置跳转点,并将当前程序状态保存到一个缓冲区中。当程序需要从该跳转点继续执行时,可以使用 longjmp() 函数恢复之前保存的程序状态并返回到该跳转点。 |
参数:
- env : 要保存程序状态的缓冲区,通常声明为
jmp_buf类型
返回值:
setjmp() 函数返回 0,除非它是从 longjmp() 函数调用返回的,这种情况下,它返回非零值。
17.2 演示示例
1 |
|
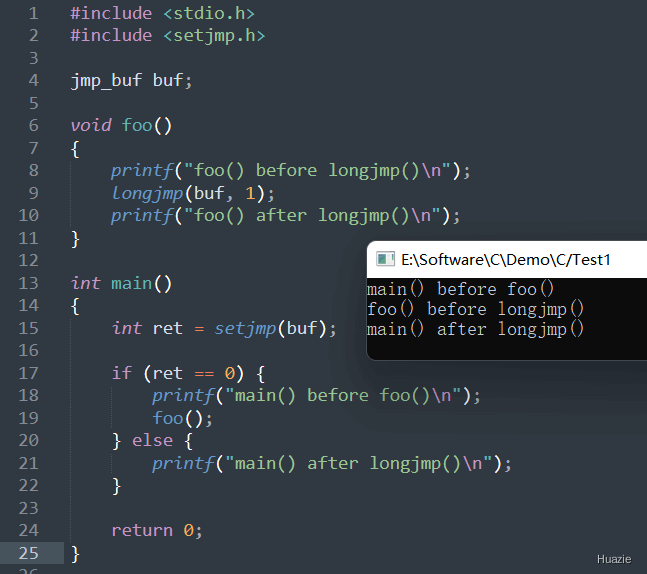
在上述的示例程序中,
- 我们首先定义了一个名为
buf的jmp_buf类型的缓冲区,并将其作为参数传递给setjmp()函数,当前程序状态将保存到 buf 缓冲区中,并返回一个整形,用ret变量存储;此时ret的值为 0,则说明是第一次调用setjmp()函数,主函数内打印输出”main() before foo()“ - 然后我们调用
foo()函数,打印输出”foo() before longjmp()“; - 接着调用
longjmp()函数,将会返回到setjmp()函数调用的位置,并传递了一个值1。因为longjmp()调用一定会返回setjmp()函数调用的位置,因此foo()函数的后面一行代码永远不会被执行。 - 最后
setjmp()函数返回ret的值为 1,则说明是从longjmp()函数中返回的,主函数内打印输出”main() after longjmp()“。
17.3 运行结果