引言
前两篇博文笔者带大家从源码深入了解了 Spring Boot 的自动装配流程,其中自动配置过滤的实现由于篇幅限制,还未深入分析。
那么从本篇开始,Huazie 就带大家走近 AutoConfigurationImportFilter,一起从源码解析 FilteringSpringBootCondition、OnBeanCondition、OnClassCondition、OnWebApplicationCondition 的实现。
主要内容
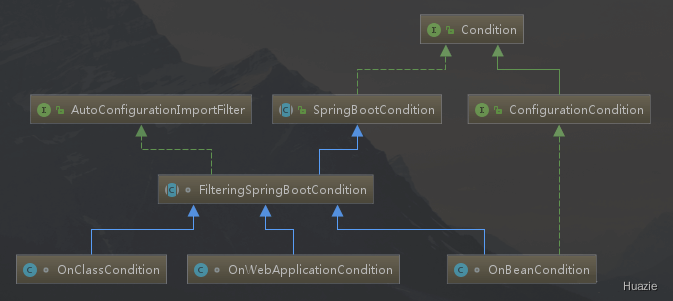
在开始本篇内容之前,我们再次来回顾一下上篇博文介绍的 AutoConfigurationImportFilter 的源码和相关的类图:
1 |
|

通过上面的关联类图,我们可以看到 AutoConfigurationImportFilter 接口实际上是由抽象类 FilteringSpringBootCondition 来实现的,另外翻看它的源码,该抽象类还定义了一个抽象方法 getOutcomes ,然后 OnBeanCondition、OnClassCondition、OnWebApplicationCondition 继承该抽象类,实现 getOutcomes 方法,完成实际的过滤匹配操作。
本篇,我们就从源码入手重点介绍 FilteringSpringBootCondition :
1. match 方法
上一篇博文我们已经从 FilteringSpringBootCondition 的部分源码进行了分析,它的 match 方法主要是调用 getOutcomes 方法,并将其返回的结果转换成布尔数组。而这个 getOutcomes 方法是过滤匹配的核心功能,由抽象类 FilteringSpringBootCondition 的子类来实现它。
这里再简单回顾一下 match 方法的处理逻辑:
1 |
|
上述代码中,我们可以看到,将 getOutcomes 方法返回结果转换成布尔数组的循环逻辑中有一段代码如下:
1 | match[i] = (outcomes[i] == null || outcomes[i].isMatch()); |
这里是将返回结果转换成布尔值,分别是:
- 如果匹配结果为
null,认为符合匹配要求, 设置match[i] = true; - 如果匹配结果不为
null,并且 匹配对象的isMatch == true,也认为符合匹配要求, 设置match[i] = true;
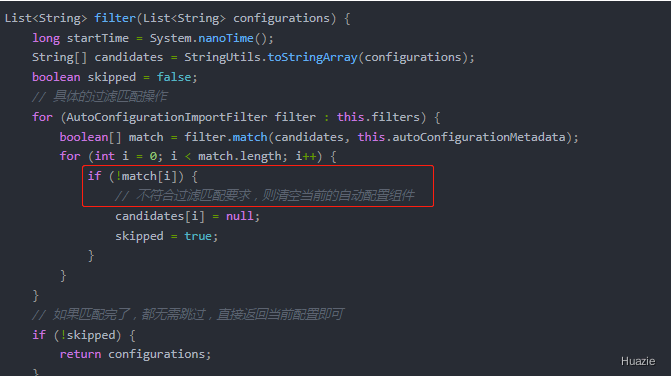
这个时候,我们就能理解 上篇博文讲到的 不符合过滤匹配要求,则清空当前的自动配置组件 的逻辑:

当然 FilteringSpringBootCondition 内还有其他的内容,这些内容在它的子类中也将使用到,我们先提前了解下,以便后续能更好地理解子类的功能实现。
2. ClassNameFilter 枚举类
首先查看 ClassNameFilter 枚举类的源码【Spring Boot 2.7.9】:
1 | protected enum ClassNameFilter { |
ClassNameFilter 枚举类包含两个枚举常量,分别是 PRESENT 和 MISSING;这两个枚举常量都实现了 ClassNameFilter 枚举类定义的 matches 的抽象方法,其中
PRESENT中的matches返回isPresent(className, classLoader);MISSING中的matches返回!isPresent(className, classLoader);
我们继续看 isPresent 方法,分析一下它的功能:
1 | static boolean isPresent(String className, ClassLoader classLoader) { |
上述 isPresent 方法的逻辑其实也并不复杂,就是通过类加载器去加载指定的类【即 className 字符串对应的类】:
- 如果指定的类加载成功,则直接返回
true; - 如果指定的类加载失败,则要抛出异常,捕获异常后,返回
false。
那显然 ClassNameFilter.PRESENT.matches(className, classLoader) 用于校验指定的类是否加载成功:
- 如果指定的类加载成功,则返回
true; - 如果指定的类加载失败,则返回
false。
而 ClassNameFilter.MISSING.matches(className, classLoader) 用于校验指定的类是否加载失败:
- 如果指定的类加载失败,则返回
true; - 如果指定的类加载成功,则返回
false。
3. filter 方法
继续翻看 FilteringSpringBootCondition 源码,还有一个 filter 方法需要重点介绍下:
1 | protected final List<String> filter(Collection<String> classNames, ClassNameFilter classNameFilter, ClassLoader classLoader) { |
结合上面的 ClassNameFilter 枚举类,我们可以很容易理解上面的代码逻辑。
- 如果
classNameFilter是ClassNameFilter.PRESENT,则filter方法获取指定的类集合中加载成功的类集合【即匹配成功的类集合】; - 如果
classNameFilter是ClassNameFilter.MISSING,则filter方法获取指定的类集合中加载失败的类集合【即匹配失败的类集合】。
总结
本篇 Huazie 带大家介绍了自动配置过滤匹配的核心父类 FilteringSpringBootCondition,这对于笔者后续博文详解它的三个子类【OnBeanCondition、OnClassCondition、OnWebApplicationCondition】非常重要,敬请期待!!!。
