
引言
上篇博文我们了解了 @EnableAutoConfiguration 注解,其中真正实现自动配置功能的核心实现者 AutoConfigurationImportSelector 还没有详细说明,本篇将从它的源码入手来重点介绍。

主要内容
在介绍 AutoConfigurationImportSelector 之前,有必要了解下它所实现的 ImportSelector 接口 ,如下所示:
1. ImportSelector 接口
在上篇博文中,我们介绍过 @Import 注解,它的许多功能其实是需要 ImportSelector 接口来实现,ImportSelector 接口决定可引入哪些 @Configuration。
下面我们来看一下 ImportSelector 接口的源码【spring-context:5.3.25】:
1
2
3
4
5
6
7
8
9
10
11
12
13
14
15
16
17
18
19
20
21
22
23
24
25
26
27
28
29
30
31
32
33
34
35
36
37
38
39
40
41
42
43
44
45
46
47
48
49
|
public interface ImportSelector {
String[] selectImports(AnnotationMetadata importingClassMetadata);
@Nullable
default Predicate<String> getExclusionFilter() {
return null;
}
}
|
通过阅读上述源码,我们可以看到 ImportSelector 接口提供了一个参数为 AnnotationMetadata【它里面包含了被 @Import 注解的类的注解信息,即注解元数据】 的方法 selectImports ,并返回了一个字符串数组【可以根据具体实现决定返回哪些配置类的全限定名】。
源码注释里也提到了,如果我们实现了 ImportSelector 接口的同时又实现了以下的 4 个 Aware 接口,那么 Spring 保证在调用 ImportSelector 之前会先调用 Aware 接口的方法。
这 4 个 Aware 接口分别是:
EnvironmentAwareBeanFactoryAwareBeanClassLoaderAwareResourceLoaderAware
我们本篇要重点进行源码解析的 AutoConfigurationImportSelector 就实现了上述 4 个 Aware 接口,部分源码如下所示:
1
2
3
4
5
6
7
8
9
10
11
12
13
14
15
16
|
import org.springframework.beans.factory.BeanClassLoaderAware;
import org.springframework.beans.factory.BeanFactoryAware;
import org.springframework.context.EnvironmentAware;
import org.springframework.context.ResourceLoaderAware;
import org.springframework.context.annotation.DeferredImportSelector;
import org.springframework.core.Ordered;
public class AutoConfigurationImportSelector implements DeferredImportSelector, BeanClassLoaderAware,
ResourceLoaderAware, BeanFactoryAware, EnvironmentAware, Ordered {
}
|
从上面的 类定义中,我们可以看到 AutoConfigurationImportSelector 并没有直接实现 ImportSelector 接口,而是实现了 DeferredImportSelector 接口【它是 ImportSelector 的子接口 】。
2. DeferredImportSelector 接口
那 AutoConfigurationImportSelector 为啥不直接实现 ImportSelector 接口,而是实现了 DeferredImportSelector 接口呢?它们俩有什么区别呢?
在讲解清楚之前,我们先来看看 DeferredImportSelector 接口的源码【spring-context:5.3.25】:
1
2
3
4
5
6
7
8
9
10
11
12
13
14
15
16
17
18
19
20
21
22
23
24
25
26
27
28
29
30
31
32
33
34
35
36
37
38
39
40
41
42
43
44
45
46
47
48
49
50
51
52
53
54
55
56
57
58
59
60
61
62
63
64
65
66
67
68
69
70
71
72
73
74
75
76
77
78
|
public interface DeferredImportSelector extends ImportSelector {
@Nullable
default Class<? extends Group> getImportGroup() {
return null;
}
interface Group {
void process(AnnotationMetadata metadata, DeferredImportSelector selector);
Iterable<Entry> selectImports();
class Entry {
private final AnnotationMetadata metadata;
private final String importClassName;
public Entry(AnnotationMetadata metadata, String importClassName) {
this.metadata = metadata;
this.importClassName = importClassName;
}
public AnnotationMetadata getMetadata() {
return this.metadata;
}
public String getImportClassName() {
return this.importClassName;
}
}
}
}
|
通过阅读上述源码,可以了解到之所以 AutoConfigurationImportSelector 没有直接实现 ImportSelector 接口,而是实现了 DeferredImportSelector 接口,是因为通过DeferredImportSelector 接口能够在处理自动配置时,拥有更高的灵活性和可定制性。
总结来讲,它们的区别主要是如下几个方面:
延迟导入:DeferredImportSelector 具有延迟导入的能力,可以在所有的 @Configuration 类都被处理完毕之后再进行选择和导入。这样可以在整个配置加载过程完成后再根据某些条件或规则来决定要导入哪些类,从而实现更加动态和灵活的自动配置机制。
自定义扩展:通过实现 DeferredImportSelector 接口,开发人员可以更方便地扩展和定制自动配置逻辑。可以根据实际需求重写相应方法,实现自定义的自动配置规则和行为。
上述源码注释中,也说明了 DeferredImportSelector 的加载顺序可以通过 @Order 注解 或 实现 Ordered 接口来指定。它还可以提供一个导入组,实现在不同的选择器之间提供额外的排序和过滤逻辑,从而实现自定义 Configuration 的加载顺序。
3. AutoConfigurationImportSelector 功能概述
好了到这里,我们终于可以开始正式介绍 AutoConfigurationImportSelector 了。
下面我们通过如下的流程图,从整体上来了解 AutoConfigurationImportSelector 的核心功能及流程【其中省略了外部通过 @Import 注解调用该类的部分】:
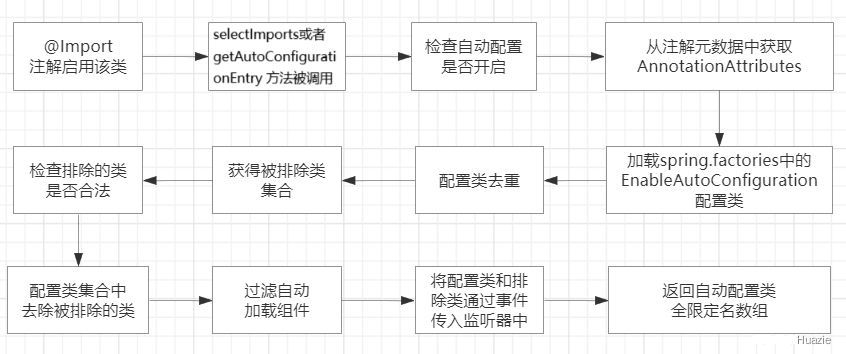
当 AutoConfigurationImportSelector 被 @Import 注解引入之后,它的 selectImports 方法会被调用并执行其实现的自动装配逻辑。
下面我们来看看 selectImports 方法的源码,如下所示 【Spring Boot 2.0.9.RELEASE】:
1
2
3
4
5
6
7
8
9
10
11
12
13
14
15
16
17
18
| @Override
public String[] selectImports(AnnotationMetadata annotationMetadata) {
if (!isEnabled(annotationMetadata)) {
return NO_IMPORTS;
}
AutoConfigurationMetadata autoConfigurationMetadata = AutoConfigurationMetadataLoader
.loadMetadata(this.beanClassLoader);
AnnotationAttributes attributes = getAttributes(annotationMetadata);
List<String> configurations = getCandidateConfigurations(annotationMetadata,
attributes);
configurations = removeDuplicates(configurations);
Set<String> exclusions = getExclusions(annotationMetadata, attributes);
checkExcludedClasses(configurations, exclusions);
configurations.removeAll(exclusions);
configurations = filter(configurations, autoConfigurationMetadata);
fireAutoConfigurationImportEvents(configurations, exclusions);
return StringUtils.toStringArray(configurations);
}
|
注意: 随着 Spring Boot 的版本演进,自动配置类加载的方式与上述有所区别。 虽然不从 selectImports 进入,但是核心代码不变。
如下 getAutoConfigurationEntry 中所示【Spring Boot 2.7.9】:
1
2
3
4
5
6
7
8
9
10
11
12
13
14
15
16
17
18
19
20
21
22
23
24
25
26
27
28
29
|
protected AutoConfigurationEntry getAutoConfigurationEntry(AnnotationMetadata annotationMetadata) {
if (!isEnabled(annotationMetadata)) {
return EMPTY_ENTRY;
}
AnnotationAttributes attributes = getAttributes(annotationMetadata);
List<String> configurations = getCandidateConfigurations(annotationMetadata, attributes);
configurations = removeDuplicates(configurations);
Set<String> exclusions = getExclusions(annotationMetadata, attributes);
checkExcludedClasses(configurations, exclusions);
configurations.removeAll(exclusions);
configurations = getConfigurationClassFilter().filter(configurations);
fireAutoConfigurationImportEvents(configurations, exclusions);
return new AutoConfigurationEntry(configurations, exclusions);
}
|
总结
通过阅读上述源码,对照相关的流程图,我们从整体上了解了 AutoConfigurationImportSelector 自动装配逻辑的核心功能及流程,由于篇幅有限,更加细化的功能及流程解析,笔者将在后续的博文中,带大家一起通过源码来一步步完成,敬请期待!!!